Pages

Monday 30 January 2012

How to make Ghee at home

Clarified Butter (ghee) in Marathi

Time: 25 to 30 minutes
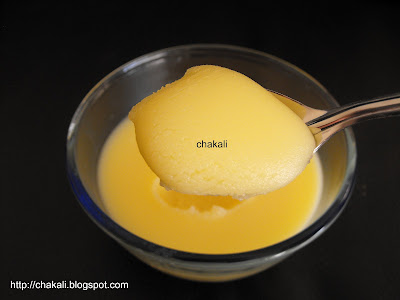
Yield: 2.25 LB clarified butter (from 3 LB unsalted butter)

Ingredients:
3 LB unsalted butter

Method:
1) Let the butter come to room temperature. Add it to a deep pan. Melt over medium high heat. Do not keep the boiling butter unattended.
2) First, you will notice lots of froth on the surface. Gradually it will calm down and will start settling down at the bottom. (It will take about 15 minutes) (Tip 1)
3) After few minutes, you will notice the bubbles are becoming clear. Once you reached this point, you are 4-5 minutes away from getting flavorful clarified butter. Lower the heat and add a few drops of water. If the butter has clarified properly, you will hear a crackling sound. If you don't, then boil for couple of minutes more.
4) Once butter is clarified, let it cool down a bit (Do not wait till butter solidifies). Strain through a fine meshed "Metal" strainer. (Do not use plastic strainer)
5) After straining, keep the pan tilted to collect more butter. After 15-20 minutes, you will be able to get around a tbsp ghee where pan is tilted. Strain that too.
From 3 LB unsalted butter, you will get 2.25 LB clarified butter (from 1 KG 360 grams butter will make around 1 KG clarified butter.)


Tips:
1) The time required for clarifying butter may vary depending on the amount of butter (less butter, less time needed), stove flame etc.
2) If you strain the ghee (if ghee is slightly hot) with plastic strainer, it might melt.
3) You can use homemade butter (makkhan/लोणी) to make ghee.


clarifed butter, how to make ghee at home, toop,

तूप - Clarified butter at home

Clarified Butter (ghee) in English

वेळ: २५ ते ३० मिनिटे
२.२५ पौंड तूप (साधारण १ किलो तूप)

साहित्य:
३ पौंड अनसॉल्टेड बटर (मीठ विरहित)

clarified butter, ghee, toopकृती:
१) बटर रूम टेम्परेचरला येउ द्यात. बटर एका मोठ्या खोलगट अशा जाड बुडाच्या पातेल्यात घाला. मोठ्या आचेवर पातळ होवू द्यात आणि नंतर आच मिडीयम-हायच्या मध्ये ठेवा. तूप बनेस्तोवर पातेल्यावर लक्ष ठेवा, सुरुवातीला आच मोठी ठेवली असल्याने तूप उतू जावून अपघात होण्याची शक्यता असते. म्हणून मोठे खोलगट भांडे घ्यावे.
२) सुरुवातीला बटर वितळल्यावर बराच फेस दिसेल. हळूहळू फेस कमी होवू लागेल आणि तळाला सेटल होईल. (पूर्ण प्रोसेसला साधारण १५-२० मिनिटे लागतील.) (टीप १)
३) काही मिनीटांनी बुडबुडे पारदर्शक होतील. आणि बटरसुद्धा पारदर्शक होईल. असे झाले कि ४-५ मिनिटातच तूप तयार होईल. आता आच कमी करावी आणि तुपात थोडे पाण्याचे थेंब टाकावे. जर तूप चांगले कढवले गेले असेल तर पाणी पडताच तूप तडतडायला लागेल. म्हणजे तूप तयार झाले. जर तसे न घडल्यास आच मध्यम करावी. एक दोन मिनीटानी परत पाण्याचे थेंब घालून पहावे.
४) तूप कढवले गेले कि थोडेसे कोमट होवू द्यावे. आणि बारीक जाळीच्या मेटलच्या गाळण्याने गाळून घ्यावे. (प्लास्टिकचे गाळणे वापरू नये)
५) गाळल्यावर पातेले १० मिनिटे तिरके करून ठेवावे म्हणजे तूप ओघळून तळाला जमा होईल. हेही तूप वापरावे.
३ पौंड बटरमधून २.२५ पौंड तूप तयार होते. (१ किलो ३६० ग्राम बटरपासून साधारण १ किलो तूप मिळते.)


टीपा:
१) तूप कढवायला लागणारा वेळ हा कमी जास्त होवू शकतो. कारण जर बटर कमी घेतले किंवा आच मोठी ठेवली असेल तर तूप कमी वेळात होते.
२) तूप गरम असल्यास प्लास्टिकच्या गाळण्याने गाळले तर गाळणे वितळू शकते.
३) घरगुती लोण्यापासूनही तूप अशाच पद्धतीने बनवतात.

clarifed butter, how to make ghee at home, toop,

Friday 27 January 2012

Baked Croutons

Croutons in Marathi

Makes: 4 to 5 servings
Time: 20 minutes

garlic croutons, Homemade croutons recipe, baked croutons, easy crouton recipeIngredients:
4 bread slices
2 tbsp Olive Oil
2-3 pinches of salt
1/2 tsp of Garlic powder (Optional)
1/2 tsp Italian Herbs blend (Dried)

Method:
1) Brush little olive oil on each bread slice. Cut each bread slice into 12 small pieces. If you want little bigger sized croutons, then make 9 equal pieces.
2) Preheat oven at 300 F (150 C) for 7 minutes.
3) Spread bread pieces on a baking sheet. Make a single layer, sprinkle Italian Herbs, little salt and garlic powder. Pop in the oven for 15 minutes (until they become light brown and crispy). If croutons are not browning evenly on all sides, turn over after 10 minutes. Cool them on baking sheet.
Croutons can be added in Salads to give little crisp. They are great accompaniment to the soup.

Tips:
1) Croutons can be prepared in the pan. Follow the first step from the above method. Sprinkle spices and salt. Then heat a wide skillet over low heat. Saute bread pieces until crispy and golden brown. Turn them over occasionally.
2) Butter can be used instead of olive oil. (If using salted butter, limit the amount of salt)
3) If you don't have garlic powder and Italian herbs like oregano, rosemary, etc that's okay. Plain croutons taste good too.
4) You can sprinkle some red chili flakes alongwith other spices.

बेक्ड कृटॉन्स (गार्लिक फ्लेवर्ड) - Garlic Croutons

Croutons in English

वेळ: २० मिनिटे
वाढणी: ४ ते ५ सर्व्हिंग्स

garlic croutons, Homemade croutons recipe, baked croutons, easy crouton recipeसाहित्य:
४ ब्रेड स्लाईस
२ टेस्पून ऑलिव्ह ऑइल
२ ते ३ चिमटी मीठ
१/२ टीस्पून लसूण पावडर (ऐच्छिक)
१/२ टीस्पून इटालियन हर्ब्ज (ड्राय)

कृती:
१) ब्रेड स्लाईसवर ऑलिव्ह ऑइल ब्रश करावे. प्रत्येक ब्रेड स्लाईसचे १२ लहान चौकोनी तुकडे करावे. जर मोठे कृटॉन्स हवे असतील तर ९ चौकोनी तुकडे करा.
२) ओव्हन ३०० F (१५० C) वर ७ मिनिटे प्रिहिट करावा.
३) ब्रेडचे तुकडे बेकिंग शीटवर पसरवावे. सिंगल लेयर करावा, तुकडे एकावर एक येऊ देवू नये. यावर इटालियन हर्ब्ज, लसूण पावडर आणि मीठ भूरभुरावे. ओव्हनमध्ये १५ मिनिटे बेक करावे. कृटॉन्स लाईट ब्राउन आणि आतपर्यंत कुरकुरीत होवू द्यावे. जर कृटॉन्स खालच्या बाजूला कुरकुरीत होत नसतील तर १० मिनिटानी कालथ्याने पलटावे आणि उरलेली ५ मिनिटे बेक करावे. कृटॉन्स ओव्हन बाहेर काढून गार होवू द्यावे.
कृटॉन्स सलाडमध्ये कुरकुरीतपणा आणण्यासाठी किंवा सुपबरोबर खायला छान लागतात.

टीपा:
१) कृटॉन्स पॅनमध्ये बनवू शकतो. कृतीतील पहिली स्टेप फॉलो करा. त्यानंतर त्यावर लसूण पावडर, मीठ आणि इटालियन हर्ब्ज भूरभूरावे. नॉनस्टिक तवा मंद आचेवर तापवून ब्रेडचे तुकडे कुरकुरीत होईस्तोवर परतावे. मध्येमध्ये कालथ्याने बाजू पलटावी.
२) ऑलिव्ह ऑईलऐवजी बटरसुद्धा वापरू शकतो.
३) जर इटालियन हर्ब्ज, लसूण पावडर नसेल तरी हरकत नाही. कृटॉन्स नुसते बटर आणि मीठ लावूनही चांगले लागतात.
४) तिखटपणासाठी रेड चिली फ्लेक्स घालून मग बेक करावे.

Tuesday 24 January 2012

Methi Gota Bhajji

Gota Bhaji in Marathi

Time: 25 to 30 minutes
Makes: 15 to 18 medium Bhajji

gujarati gota bhaji, methi gotaIngredients:
1/2 cup Besan (tip 1)
1/2 cup mung dal flour (tip 1)
3 tbsp coarse rava
1/4 cup Kasoori Methi
1 tsp garlic paste
1/2 cup yogurt or as much as needed
Spices: 2 cloves, 2 pinches of cinnamon powder, 1 tsp coriander seeds, 1/2 tsp cumin seeds, 7-8 black pepper corns - Crush together and make a coarse powder
1 tsp red chili powder
1/2 tsp turmeric powder
1/4 tsp hing
2 tsp sugar
1/8 tsp baking soda
Salt to taste
Oil for deep frying

Method:
1) Take a mixing bowl. Add besan, mung dal flour, kasoori methi, garlic paste, coarse spice powder, red chili powder, hing, turmeric, sugar and salt. Mix well. Add yogurt, a spoon at a time. Mix and make a semi-thick, sticky batter. Batter should not form a dough, but it should not be runny. Add Baking soda and mix.
2) Heat oil in a kadai. Once oil is hot, reduce the heat to medium to medium-high. Grease your palms. Take a tbsp of mixture and make a smooth round ball without any cracks on the surface. Drop carefully into hot oil. Deep fry until golden brown.
Serve hot with green chutney or Tamarind chutney.

Tips:
1) Use coarse flour to get more nice textured goda bhajji.
2) Pakoda made from doughy batter will remain uncooked from the inside. Opposite to that, you won't be able to form perfect rounds if the batter is loose in consistency. Therefore, make sticky and gooey batter. Use some oil while handling this batter, otherwise the batter will stick to your hand.
3) Kasoori methi gives nice flavor. However, you may add fresh methi leaves instead of kasoori methi.

गोटा भजी - Gota Bhaji Methi Gota

Gota Bhaji in English
वेळ: २५ ते ३० मिनीटे
साधारण १५-१८ मध्यम भजी

gujarati gota bhaji, methi gotaसाहित्य:
१/२ कप बेसन (टिप १)
१/२ कप मूगडाळ पीठ (टिप १)
१/४ कप कसुरी मेथी
१ टेस्पून लसूण पेस्ट
१/२ कप दही किंवा लागेल तेवढे
मसाले: २ लवंगा, २ चिमटी दालचिनी पावडर, १ टीस्पून अख्खे धणे, २ टीस्पून जिरे, ७-८ मिरी दाणे- सर्व कुटून भरडसर पावडर करावी.
२ टीस्पून लाल तिखट
१/२ टीस्पून हळद
१/४ टीस्पून हिंग
२ टीस्पून साखर
१/८ टीस्पून बेकिंग सोडा
चवीपुरते मीठ
गोटे तळण्यासाठी तेल

कृती:
१) एका खोलगट भांड्यात बेसन, मूगडाळ पीठ, कसुरी मेथी, लसूण पेस्ट, मसाला पावडर, लाल तिखट, हिंग, हळद, साखर आणि मीठ मिक्स करावे. यामध्ये दही घालून मिक्स करावे आणि दाटसर, चिकट असे पीठ भिजवावे. मिश्रणाचा कणकेसारखा गोळाही भिजला नाही पाहिजे आणि एकदम पातळही नाही असे पीठ भिजवावे. भजी करायच्या थोडा वेळ आधी सोडा घालून मिक्स करावे.
२) कढईत तेल गरम करावे. तेल गरम झाले की गॅस मिडियम-हायच्यामध्ये ठेवावा. हाताला तेल लावून चमचाभर मिश्रण हातात घ्यावे त्याचा गोळा बनवावा आणि तेलात सोडावा. अशाप्रकारे सर्व गोटा भजी तळून घ्यावी.
भजी हिरवी किंवा चिंच चटणीबरोबर सर्व्ह करावी.

टिप्स:
१) बेसन आणि मूगडाळ यांचे रवाळ पीठ मिळाल्यास भाजी जास्त चांगली होईल.
२) जर मिश्रणाचा कणकेसारखा गोळा बनवून त्याची भजी केल्यास आतून गच्च आणि कच्ची राहते. आणि मिश्रण गरजेपेक्षा पातळ झाल्यास गोल गोटे बनत नाहीत. म्हणून मिश्रण चिकट्‌सर घट्ट बनवावे. आणि पीठ हाताळताना हातांना तेल लावावे. नाहीतर मिश्रण हातालाच चिकटेल.
३) कसुरी मेथीमुळे छान फ्लेवर येतो. पण आवडत असल्यास फ्रेश मेथीची पानेसुद्धा बारीक चिरून घालू शकतो.

Thursday 19 January 2012

Pitta bread Pizza


Time: 30 minutes
Makes : 4 servings

veggie pizza, quick pizza recipe, pita bread pizzaIngredients:
1/2 cup Pizza sauce
1 small red onion, Make thin round slices, then separate the rings.
1 small bell pepper, julienne
5-6 Mushrooms, thin slices
2 tbsp sweet corns, boiled
1.5 cup mozzarella cheese, grated
1/2 tsp red chili flakes
1/4 tsp Italian seasoning
2 tsp Olive oil
Salt to taste

Method:
1) Preheat oven at 400 F for 10 minutes
2) Heat a pan. Add 1 tsp olive oil, saute onion rings, bell pepper slices, mushroom slices and sweet corns. Sprinkle little salt, Italian seasoning and red chili flakes. Saute for two minutes. Remove pan from heat.
3) Brush little oil to pita breads. Place pita bread on a baking sheet. Put it in the oven for two minutes, just to make them warm. Take the baking sheet out.
4) Spread Pizza sauce evenly, 1 to 2 tbsp on each pita bread. Sprinkle cheese, 1/4 cup on each bread. Place sauteed onion rings, bell pepper juliennes, mushroom slices, and sweet corns.
5) Put pita bread pizzas in the oven. Bake for 8 minutes or until cheese melts and becomes slightly brown.
Serve hot.
For more flavor, sprinkle some grated parmesan cheese.

Tips:
1) Try some other of toppings to create your own pizza. Pineapple pieces, black olives, Jalapino peppers, Broccoli etc can make a delicious pizza.

पिटा ब्रेड पिझ्झा - Pita bread Pizza

Pita Bread Pizza in English

वेळ: ३० मिनिटे
वाढणी: ४ जणांसाठी

veggie pizza, quick pizza recipe, pita bread pizzaसाहित्य:
पिटा ब्रेड
१/२ कप पिझ्झा सॉस
१ लहान कांदा, गोल चकत्या करून त्या सोडवून रिंग्स कराव्यात
१ लहान भोपळी मिरची, पातळ उभे काप
५-६ मश्रूम्स, पातळ काप
२ टेस्पून स्वीट कॉर्न, उकडलेले
१ कप मोझेरेला चीज, किसलेले
१/२ टीस्पून रेड चिली फ्लेक्स
१/४ टीस्पून इटालियन सिझनिंग
२ टीस्पून ऑलिव्ह ऑइल
चवीपुरते मीठ

कृती:
१) ओव्हन ४०० F वर १० मिनिटे प्रीहीट करावे
२) एक पॅन गरम करून त्यात एक टीस्पून ऑलिव्ह ऑइल घालून त्यात कांदा, भोपळी मिरची, मश्रूम्स, आणि स्वीट कॉर्न घालून १ मिनिट परतावे. त्यावर थोडे रेड चिली फ्लेक्स, मीठ आणि इटालियन सिझनिंग घालावे. मिक्स करून एका प्लेटमध्ये काढून ठेवावे.
३) पिटा ब्रेडला थोडे ऑलिव्ह ऑइल ब्रश करून घ्यावे. पिटा ब्रेड बेकिंग शीटवर ठेवून ओव्हनमध्ये २-३ मिनिटे गरम करून घ्यावे.
४) बाहेर काढून त्यावर पिझ्झा सॉस लावावा. प्रत्येक पिटा ब्रेडवर साधारण ४ ते ६ टेस्पून चीज घालून त्यावर परतलेल्या भाज्या घालाव्यात.
५) पिटा ब्रेड ओव्हनमध्ये ठेवून साधारण ८ मिनिटे बेक करावे किंवा चीज वितळून लाईट ब्राउन झाले कि बाहेर काढावे.
गरमच सर्व्ह करावे.

टीपा:
१) आपल्या आवडीनुसार दुसरी टॉपिंग्जसुद्धा वापरू शकतो. जसे अननसाचे छोटे तुकडे, ब्लॅक ऑलिव्ज, अल्पिनो पेपर्स, ब्रोकोली इत्यादी.

Tuesday 17 January 2012

Alepak (ginger candy)

Ginger Candy in Marathi
Time: 25 to 30 minutes
Yield: 15 medium pieces

alyachya vadya, ginger candy, alepak, adrak ki burfi
Ingredients:
100 gram ginger roots
1.5 cup sugar (tip 5)
1/2 cup Khova or milk powder
1 tsp ghee

Method:
1) Wash and peel the ginger root. Cut into small pieces. (It will be around 1 cup)
2) Add ginger pieces, sugar and khova into a blender. Blend well and make a fine puree.
3) Keep a steel plate ready. Grease it with some ghee.
4) Heat ghee into a deep saucepan. Add ginger-sugar mixture. Cook over medium-high heat. Keep stirring and do not let the mixture settle at the bottom.
5) Mixture will thicken within 10 minutes. You will notice whitish froth around bubbles. Now within couple of minutes the mixture will be ready to spread. The mixture will gather in the center.
6) Immidiately spread the mixture on greased plate and spread with spatula or greased flat based bowl. Cut into 1 inch squares.
Let it cool down. Separate these vadis, and keep in airtight container.

Tips:
1) Peeling and cutting ginger root into small pieces is important. Ginger is fibrous. Hence, won't get ground well if big chunks are used.
2) Instead of Khava or milk powder, 1/2 cup malai alongwith little whole milk can be used. Incase of using malai, cook the mixture few minutes more as it has more moisture content than Khava/milk pdr to evaporate.
3) During winter time (or in cold regions) spread the mixture on plate once it becomes frothy. During winter, mixture thickens faster. If you cook longer (even for 2 minutes) vadya will become very hard or mixture turns crumbly.
4) Milk, Khava, or milk powder are used to reduce the intense hotness of ginger. Incase, you don't want to add any of these ingredient, still ginger vadi will taste good.
5) Use 1.5 cups of granulated sugar for 1 cup ginger pieces. If using Indian style sugar which has little larger granules, then use 2 cups of sugar for 1 cup of ginger.

आल्याच्या वड्या - Alyachya Vadya


वेळ: २५ ते ३० मिनिटे
१५ माध्यम वड्या

alyachya vadya, ginger candy, alepak, adrak ki burfiसाहित्य:
१०० ग्राम आलं
दीड कप साखर (टीप ५)
१/२ कप खवा किंवा मिल्क पावडर
१ टीस्पून तूप

कृती:
१) आलं धुवून त्याची सालं काढावीत. आल्याचे १ सेमीचे लहान-लहान तुकडे करावे (साधारण १ कप वरपर्यंत भरून).
२) आल्याचे तुकडे, साखर आणि खवा एकत्र मिक्सरमध्ये बारीक प्युरी करावी.
३) स्टीलच्या ताटाला तूप लावून घ्यावे. तसेच स्टीलच्या वाटीला बाहेरून तळाला तूप लावावे.
४) एका जाड बुडाच्या पातेल्यात तूप गरम करून आलं-साखरेचे मिश्रण घालावे. मिडीयम-हाय फ्लेमवर मिश्रण सारखे ढवळत राहावे. मिश्रण तळाला बसू देवू नये.
५) मिश्रण साधारण १० मिनिटे झाल्यावर आटेल. मिश्रणात बुडबुडे असतात त्याच्या बाजूला पांढरा फेस तयार होईल (महत्त्वाची टीप ३ पहा). त्याचा अर्थ दोनेक मिनिटात मिश्रण थापायला तयार होईल. मिश्रण कडेने सुटून मधोमध जमा झाले कि लगेच तूप लावलेल्या ताटलीवर ओतावे.
६) लगोलग वाटीने मिश्रण समान थापावे आणि सुरीने वड्या पाडाव्यात.
७) गार झाले कि वड्या सोडवून घ्याव्यात. डब्यात भरून ठेवाव्यात.

टीपा:
१) आलं सोलून चिरून मगच मिक्सरमध्ये बारीक करावे. अल्यामध्ये आतील भागाला दोरे असतात. मोठे तुकडे करून आले बारीक केल्यास मिक्सरमध्ये निट बारीक होत नाही.
२) खवा किंवा मिल्क पावडर ऐवजी वाटीभर सायीसकट दुध घातले तरी चालते. फक्त मिश्रण पातळ झाल्याने काही मिनिटे जास्त आटवायला लागेल.
३) जर थंड प्रदेशात राहत असाल तर मिश्रण फेसाळायला लागले कि १ मिनिटातच मिश्रण ताटावर थापावे. कारण थंडीमुळे मिश्रण भरभर आळते आणि वड्या कडकडीत होतात किंवा वड्या पडत नाहीत.
४) फक्त आलं आणि साखरेच्या वड्याही करता येतात. दुध, खवा, मिल्क पावडर हे फक्त वड्यांचा तिखटपणा थोडा कमी करण्यासाठी घातले आहे.
५) ग्रानुलेटेड शुगर वापरल्याने दीड कप साखर वापरली आहे. ग्रानुलेटेड शुगर ही पिठीसाखरेएवढी फाईन नसते पण रव्याएवढी बारीक असते. भारतात थोडी दाणेदार साखर असते. त्यामुळे १ कप भरून आल्याचे तुकडे असल्यास २ कप साखर वापरावी.

Thursday 12 January 2012

Grilled Paneer Sandwich

Paneer Sandwich in Marathi

Time: 20 minutes
Yield: 3 sandwiches

paneer sandwich, grilled paneer sandwich, paneer toast sandwich, paneer quick snacks recipes, one dish meal recipes, quick snack recipesIngredients:
6 Bread slices
3 tbsp Onion julienne
3 tbsp Bell Pepper julienne
1 tsp Chat masala
3 tbsp green chutney
1 tbsp butter
Stuffing:
75 gram paneer, small cubes
1/2 tsp cumin powder
2 to 3 tbsp Tomato Ketchup
Salt to taste

Method:
1) In a small bowl, mix cumin powder, tomato ketchup and pinch of salt. Marinate paneer cubes in it for 10 minutes. Paneer cubes should be well coated.
2) Grill paneer pieces or you may stir fry them in a pan with little butter or olive oil. After grilling keep aside.
3) Apply little butter on both sides of the bread. Toast the bread slices in a pan over low flame.
4) Now apply green chutney on 3 bread slices. Add paneer pieces and vegetables. Sprinkle some chat masala. Take the remaining bread slices and apply green chutney. Finish making sandwiches.
5) Grill them well or you can use a nonstick pan to toast them. If using nonstick pan, Toast one side on medium-low flame. After 2-3 minutes, use a wide spatula and gently flip to the other side. Toast another side for couple more minutes.

Serve hot with green chutney and tomato ketchup.

Tips:
1) If making for kids, use very mild green chutney or use no green chili.
2) Use readymade paneer as it does not melt quickly.

Wednesday 11 January 2012

पनीर टोस्ट सॅंडविच - Paneer Toast Sandwich

Paneer Sandwich in English

वाढणी: ३ सॅंडविचेस
वेळ:२० मिनिटे

paneer sandwich, grilled paneer sandwich, paneer toast sandwich, paneer quick snacks recipes, one dish meal recipes, quick snack recipesसाहित्य:
६ ब्रेडचे स्लाईसेस
३ टेस्पून कांदा, उभा पातळ चिरून
३ टेस्पून भोपळी मिरची, उभे पातळ कप
१ टीस्पून चाट मसाला
३ टेस्पून हिरवी चटणी
१ टेस्पून बटर
स्टफिंग:::
७५ ग्राम पनीर, लहान चौकोनी तुकडे
१/२ टीस्पून जिरेपूड
२ ते ३ टेस्पून टोमॅटो केचप
चवीपुरते मीठ

कृती:
१) एका लहान बोलमध्ये टोमॅटो केचप, जिरेपूड आणि अगदी चिमुटभर मीठ घालून मिक्स करावे. यामध्ये पनीरचे तुकडे १० मिनिटे मॅरीनेट करून ठेवावे.
२) पनीरचे तुकडे ग्रील करावे. जर ग्रील नसेल तर नॉनस्टिक पॅनमध्ये थोड्या बटरवर किंवा ऑलिव्ह ऑइलमध्ये थोडे परतून घ्यावे. ग्रील केल्यावर पनीर बाजूला काढून ठेवावे.
३) ब्रेड स्लाईसेस वर बटर लावून घ्यावे. कमी आचेवर ब्रेड थोडे टोस्ट करून घ्यावे.
४) ३ ब्रेड स्लाईसेस वर हिरवी चटणी लावून घ्यावी. त्यावर पनीरचे तुकडे आणि भाज्या घालाव्यात. थोडा चाट मसाला भुरभुरावा. आता उरलेले ब्रेड स्लाईसेस घेउन त्यावर हिरवी चटणी लावावी. आणि पनीरच्या तुकड्यांवर ठेवून सॅंडविच तयार करावे.
५) सॅंडविचेस ग्रील करून घ्यावे किंवा नॉनस्टिक पॅनमध्ये थोडे बटर घालून दोन्ही बाजू मध्यम आचेवर टोस्ट करावे. जर नॉनस्टिक पॅन वापरणार असाल तर आच कमी ठेवावी. आणि २-३ मिनिटानी कालथ्याने हलकेच पलटावे. दुसरी बाजूही छान भाजून घ्यावी.

सॅंडविच हिरव्या चटणीबरोबर किंवा टोमॅटो केचपबरोबर सर्व्ह करावे.

टिपा:
१) जर लहान मुलांसाठी हि डिश बनवायची असेल तर कमी तिखट बनवावी किंवा फक्त कोथिंबीरीची मिरची न घालता चटणी बनवावी.
२) शक्यतो रेडीमेड पनीर वापरावे. रेडीमेड पनीर आच लागल्यावर पटकन वितळत नाही.
३) मॅरीनेशनमध्ये आवडीनुसार मसालेही घालू शकतो.

Tuesday 10 January 2012

Bhindi Amti

Bhendichi Amti in Marathi
Servings: 3
Time: Prep Time- 20 minutes Cooking time 10 minutes

bhendichi amti, okra indian recipes, bhindi ki sabzi, bhendichi bhaji, bhendichya kachryaIngredients:
20 no. Bhindi (Okra or Lady finger)
For making paste: 1 small onion, 1/2 cup freshly scraped coconut, 4 big garlic cloves, 2-3 dried red chilies, 1 tsp cumin, 1 tsp coriander seeds, 1/4 tsp fenugreek seeds
For Tempering: 3 tbsp oil (Imp tip no. 1), 2 pinches mustard seeds, 2 pinches cumin seeds, 1/8 tsp hing, 1/4 tsp turmeric powder, curry leaves
2-3 kokum pieces
Salt to taste
2-3 tbsp finely chopped cilantro

Method:
1) To make the paste, thinly slice the onion. Then, mix coconut, garlic, red chilies, coriander-cumin seeds, and fenugreek seed. Add just enough hot water to cover the ingredients (around 3 to 4 tbsp). Soak for 20 minutes. Then grind well and make a fine paste.
2) Wash and wipe bhindi. cut off both ends. If the size of bhindi is small then use whole, otherwise cut into two small pieces. If using whole bhindi, give a lengthwise slit in the middle.
3) Heat a pan. Add oil and fry the bhindi over medium high flame until light brown and crispy. It will take around 7-8 minutes. We are frying bhindi in very little oil, therefore keep stirring to prevent burning. Remove fried bhindi into a plate.
4) Use the remaining oil to prepare tempering. Hence, in that same pan, add mustard seeds, cumin seeds, hing, turmeric, curryleaves and add prepared paste. Saute over high heat. Stirring continuously. Once mixture becomes dry and start loosing oil, add some water and adjust the consitency to your preference. Add salt and kokum.
5) Amti will start boiling within couple of minutes. Now add fried bhindi and boil for 2-3 minutes. Turn off heat and cover it for 5 minutes. Garnish with cilantro. Serve hot with white rice.

Tips:
1) Fry Bhindi in 3 tbsp oil and prepare tempering in the remaining oil.
2) Incase, if green mango is available, use medium pieces of green mango instead of kokum for sourness.

भेंडीची आमटी - Bhendichi Amti


वाढणी: ३ जणांसाठी
वेळ: पूर्वतयारी: २० मिनिटे | पाकृसाठी वेळ १० मिनिटे

bhendichi amti, okra indian recipes, bhindi ki sabzi, bhendichi bhaji, bhendichya kachrya
साहित्य:
२० भेंडी
वाटणासाठी: १ लहान कांदा, १/२ कप ताजा खोवलेला नारळ, ४ लसूण पाकळ्या, २-३ लाल सुक्या मिरच्या, १ टीस्पून धणे, १ टीस्पून जिरे, १/४ टीस्पून मेथीदाणे
फोडणीसाठी: ३ टेस्पून तेल (टीप १ पहा), २ चिमटी मोहोरी, २ चिमटी जिरे, १/८ टीस्पून हिंग, १/४ टीस्पून हळद, कढीपत्ता
२-३ आमसुलं
चवीपुरते मीठ
२-३ टेस्पून चिरलेली कोथिंबीर

कृती:
१) वाटणासाठी कांदा सोलून उभा चिरून घ्यावा. चिरलेला कांदा, नारळ, लसूण, मिरच्या, धणे-जिरे आणि मेथीदाणे असे सर्व एकत्र १/४ कप गरम पाण्यात भिजवावेत. १५-२० मिनिटानी मिक्सरमध्ये एकदम बारीक वाटून घ्यावे.
२) भेंडी धुवून पुसून घ्यावी. दोन्ही कडेची देठं कापून टाकावीत. जर भेंडी आकाराला लहान असेल तर अख्खीच वापरावी. नाहीतर दोन तुकडे करावे. अख्खी भेंडी वापरणार असाल तर मध्यभागी उभी चीर द्यावी.
३) मध्यम पातेल्यात तेल गरम करावे. त्यात चिरलेली भेंडी मिडीयम हाय फ्लेमवर ब्राउन होईस्तोवर तळावी. याला साधारण ७-८ मिनिटे लागतात. कमी तेलात तळत असल्याने भेंडी कालथ्याने सतत परतत राहा. भेंडी तळल्यावर एका प्लेटमध्ये काढून घ्या.
४) त्याच तेलात मोहोरी, जिरे, हिंग, हळद, कढीपत्ता घालून फोडणी करा त्यात वाटलेला मसाला घाला आणि मोठ्या आचेवर परता. मिश्रण बऱ्यापैकी कोरडे झाले आणि थोडे तेल सुटायला लागले कि त्यात पाणी घाला. पाणी घालून आवश्यक तेवढे पातळ करा. आमटीत आमसुलं आणि मीठ घाला.
५) आमटीला उकळी फुटली कि तळलेल्या भेंडी घालाव्यात आणि २-३ मिनिटे उकळू द्यावे. गॅस बंद करून आमटीवर झाकण ठेवा. ५ मिनिटे आमटी मुरू द्या आणि लगेच भाताबरोबर सर्व्ह करा.

टीपा:
१) ३ टेस्पून तेलात आधी भेंडी तळून घ्यावी आणि उरलेल्या तेलात फोडणी करावी.
२) आंबटपणासाठी आमसुलाऐवजी कैरीच्या फोडीसुद्धा घालू शकतो.

Saturday 7 January 2012

Broccoli Paratha

Broccoli Paratha in Marathi

Time: 30 minutes
Makes: 4-5 medium Parathas

broccoli paratha, healthy paratha recipe, paratha puri recipe, broccoli recipesIngredients:
::::Stuffing::::
1 medium broccoli head
1 medium onion, finely chopped
2 tsp garlic paste
1 tsp ginger paste
1 tsp garam masala
salt to taste
1 tsp chili paste
1/2 tsp amchoor powder
::::Dough::::
1 cup wheat flour
1/4 tsp turmeric powder
1/2 tsp cumin seeds
1/2 tsp salt
1 tsp oil
Other ingredients:
1/4 cup oil for roasting parathas
Some dry flour for dusting

Method:
1) First make dough. Take a mixing bowl. Add wheat flour, turmeric, cumin seeds, salt and oil. Add water and make semi soft dough.
2) Wash broccoli and cut into small florets. Grind coarsely. Add onion, ginger-garlic paste, garam masala, chili paste, amchoor powder and salt to taste. Mix well.
3) Divide dough and stuffing into 5 equal portions. Heat a nonstick tawa.
Roll one dough ball into 3 inch circle. Put one portion of stuffing at the center. Gather the edges and seal. Dust with flour. Roll and make paratha. Spray some oil on one side. Place the paratha on tawa, oiled side down.
4) Roast one side, spray some oil and flip the paratha. Roast both sides well. Serve broccoli paratha with yogurt and butter.

ब्रोकोली पराठा - Broccoli Paratha

Broccoli Paratha in English

४ ते ५ मध्यम पराठे
वेळ: ३० मिनिटे

broccoli paratha, healthy paratha recipe, paratha puri recipe, broccoli recipes
साहित्य:
::::स्टफिंग::::
१ मध्यम ब्रोकोलीचा गड्डा
१ मध्यम कांदा, बारीक चिरून
२ टीस्पून लसूण पेस्ट
१ टीस्पून आलेपेस्ट
१ टीस्पून गरम मसाला
१/२ टीस्पून आमचूर पावडर
१ टीस्पून मिरची पेस्ट
चवीपुरते मीठ
::::कव्हर::::
१ कप गव्हाचे पीठ
१/४ टीस्पून हळद
१/२ टीस्पून जिरे
१/२ टीस्पून मीठ
१ टीस्पून तेल
::::इतर जिन्नस::::
१/४ कप तेल
कोरडे पीठ पराठे लाटताना

कृती:
१) प्रथम कणिक मळून घ्या. मिक्सिंग बोलमध्ये गव्हाचे पीठ, हळद, जिरे, मीठ आणि तेल घालून मिक्स करावे. पाणी घालून पीठ घट्टसर माळून घ्यावे.
२) ब्रोकोलीचे लहान तुरे करावेत. मिक्सरमध्ये भरडसर वाटून घ्यावे. त्यात चिरलेला कांदा, आलेलसूण पेस्ट, गरम मसाला, मिरची पेस्ट, आमचूर पावडर आणि मीठ घालून मिक्स करावे.
३) ब्रोकोलीचे मिश्रण आणि मळलेली कणिक दोन्ही ५-५ समान भागात विभागावेत. एक कणकेचा गोळा घेउन ३ इंच लाटावा. मध्यभागी ब्रोकोलीच्या मिश्रणाचा एक भाग ठेवून कणकेच्या सर्व बाजू एकत्र करून सील करावे. कोरडे पीठ लावून पराठा लाटावा.
४) तवा तापवून पराठा तेल किंवा तूप सोडून दोन्ही बाजू भाजून घ्याव्यात. पराठा गरमच दही आणि बटर बरोबर सर्व्ह करावे.

टीप:
१) ब्रोकोलीचे स्टफिंग बनवून तसेच जास्त वेळ ठेवले तर त्याला पाणी सुटते आणि पराठे लाटताना फाटतात. यासाठी ब्रोकोली मिक्सरमध्ये बारीक करताना त्यात पाण्याचा अंश नसावा, ती कोरडी असेल याची काळजी घ्यावी. आणि जेव्हा पराठे बनवायचे असतील तेव्हाच स्टफिंग बनवावे.

Tuesday 3 January 2012

Bisibelebath

Bisibele Bhat in Marathi

Time: 40 minutes
Makes: 3 servings

bisibhele bhat, bhisibeli bath, bisibele bhatIngredients:
3/4 cup rice
1/4 cup toor dal
1 tbsp tamarind
1 and 1/2 cup cut vegetables (Potatoes, green beans, eggplant, carrot, cauliflower)
Spices: 1 inch piece of cinnamon, 2 cardamoms, 2 bay leaves
For tempering: 1 tbsp ghee, 1/2 tsp cumin seeds, 1/4 tsp hing, 1/4 tsp turmeric powder, 1/2 tsp red chili powder
1 tbsp Homemade sambar masala
Salt to taste
Special Tadka : 2 tbsp ghee, 1/4 tsp hing, 2 to 3 tbsp peanuts, 7-8 curry leaves

Method:
Bisibele bhat
1) Wash toor dal and pressure cook upto 4 whistles.(tip 1)
2) Soak tamarind in 1/4 cup hot water. After 10 minutes, squeeze the tamarind and bring out all the juice.
3) Heat a deep pan. Add 1 tbsp ghee. Saute cinnamon, cardamons and bayleaves for 5-7 seconds. Add cumin seeds, hing, turmeric powder, and red chili powder. Add all the vegetables except eggplant. Cover and cook for 2 minutes. Now add rice and 3 cups of water. Add tamarind juice and sambar masala. Cover and cook over medium heat.
4) We need semi solid consistency. Hence, add some water and adjust the consistency. When rice is 60 % done, add cooked dal and eggplants.
5) Cook for 10 minutes or till the rice is completely done.
6) Serve the Rice in plates. Heat a tadka pan. Add 2 tbsp ghee, hing, and peanuts. Keep the peanuts moving to cook them evenly. When peanuts become brown, add curry leaves and turn off the heat.
8) Pour this tadka over served rice. This tadka is very important and gives very nice flavor.

Tips:
1) After pressure releases, take the dal out. Do not whisk it. Let it dissolve on its own. Whisked dal changes the texture of bisibele bhat.

बिसिबेळे भात - Bisibele Bhat

Bisibele Bhath in English

वेळ: ४० मिनिटे
वाढणी: ३ जणांसाठी

bisibhele bhat, bhisibeli bath, bisibele bhatसाहित्य:
३/४ कप तांदूळ
१/४ कप तूर डाळ
१ टेस्पून चिंच
दीड कप चिरलेल्या भाज्या, मध्यम चौकोनी (बटाटा, फरसबी, वांगं, गाजर, कॉलीफ्लॉवर)
मसाले: १ इंच दालचिनीचा तुकडा, २ वेलच्या, २ तमालपत्र
फोडणीसाठी: १ टेस्पून तूप, १/२ टीस्पून जिरे, १/४ टीस्पून हिंग, १४ टीस्पून हळद, १/२ टीस्पून लाल तिखट
१ टेस्पून सांबार मसाला (शक्यतो घरगुती)
चवीपुरते मीठ
स्पेशल तडका :- २ टेस्पून तूप, १/४ टीस्पून हिंग, २ ते ३ टेस्पून शेंगदाणे, ७ ते८ कढीपत्ता पाने

कृती:
१) तूरडाळ धुवून कुकरमध्ये मऊ शिजवून घ्यावी. (टीप १ पहा)
२) चिंच १/४ कप गरम पाण्यात भिजत ठेवावी. १० मिनिटांनी चिंच कुस्करून कोळ वेगळा काढावा.
३) नॉनस्टिक पातेल्यात १ टेस्पून तूप गरम करावे. त्यात दालचीनी, वेलची, तमालपत्र घालून ५-७ सेकंद परतावे. जिरे, हिंग, हळद, आणि लाल तिखट घालून फोडणी करावी. या फोडणीत वांगे सोडून चिरलेल्या सर्व भाज्या घालाव्यात. झाकण ठेवून २ मिनिटे वाफ काढावी. आता तांदूळ आणि ३ कप पाणी घालावे. चिंच कोळ आणि सांबार मसाला घालावा. झाकण ठेवून मध्यम आचेवर शिजू द्यावे.
४) आपल्याला एकदम मऊ आणि अगदी थोडा पातळसर भात शिजवायचा आहे त्यासाठी लागल्यास पाणी घालावे. भात ६०% शिजला कि शिजवलेली तूरडाळ आणि वांगी घालावी.
५) १० मिनिटे झाकण ठेवून किंवा भात पूर्ण शिजेस्तोवर शिजवावे.
६) भात ताटामध्ये वाढावा. लगेच कढल्यात २ टेस्पून तूप गरम करावे. त्यात हिंग आणि शेंगदाणे घालावेत. शेंगदाणे लालसर होईस्तोवर परतावे. शेंगदाणे लालसर झाले कि कढीपत्ता घालावा. हि फोडणी वाढलेल्या भातावर १-२ चमचाभर घालावी. हि फोडणी फार महत्त्वाची आहे आणि यामुळे भाताची चव अजून खुलते.

टीपा:
१) तूरडाळ शिजल्यावर प्रेशरकुकरमधून बाहेर काढावी. आमटीसाठी जशी रवीने डाळ मोडतो तशी डाळ रवीने घुसळू नये. अशीच वापरावी. घुसळलेली डाळ भातात घातल्यावर भाताचे टेक्स्चर बदलते.